

This post may contain affiliate links which help support our business and keep the content on this blog free. These links are FREE to you and if you make a purchase using one of these links, YarnThrift will receive a commission. We thank you for supporting our business!
The Everflow Tee crochet top is super flowy and comfy for everyday wear. It provides lots of room to move around and is a great layering piece as well as a stand-alone top. I love to wear my top with a bralette or cute cami underneath. As we are gearing up for the fall season here, I love using this piece in layers as well.
I am always a sucker for coziness, especially when it comes to my clothes. I’m the type of person to swap out jeans for sweatpants any day of the week at any time. I love oversized fits and cozy material. With summer coming to an end for this year and fall quickly approaching, I wanted a comfy top I could wear throughout the transition. I was inspired by many of my favorite fashion brands releasing oversized cotton tees. There are so many ways to wear these types of tops and they are easily dressed up or down.
After sketching out what I wanted out of this pattern, I set out to find some comfy cotton yarn and settled on Lion Brand Coboo, and let me tell you, I was not disappointed. This yarn has an AMAZING drape and is super comfy to wear. I am already dreaming of my next project with this yarn, whether it be another crochet top or even a lightweight cardigan.
Pin for later!
Pattern Notes
- Skill Level is Beginner and the pattern uses basic stitches
- Pattern is designed to have about 2-4” positive ease around the bust and 4-6” around the sleeves
- Pattern is worked from the bottom to the top
- Constructed in 3 panels – one back panel and 2 front panels then seamed together. Sleeves are added on in the round after construction of body panels.
- Make sure to double check your unblocked gauge as you work to ensure proper fit. Blocked gauge should be checked after blocking as well. All measurements are based on the gauge listed.
Materials
Here’s what you’ll need to get started on your own top!
- Yarn: Lion Brand Coboo | Weight 3 yarn (or another similar yarn that meets the required gauge – listed below)
- Hook: 4.00mm or size needed to obtain gauge listed below
- Scissors
- Tapestry needle or other end-weaving tool
- Measuring tape
Stay in the loop, sign up for our newsletter!
Gauge
- Un-Blocked: 16 sts x 14 rows = 4”
- Blocked: 14 sts x 16 rows = 4”
Stitch Abbreviations
- Ch – chain
- St – stitch
- Sp – space
- Sl st – slip stitch
- Sc – single crochet
- Dc – double crochet
Sizing Chart
| Size | Yardage | Width/Bust | Body Stitches | Height | Sleeve Depth | Sleeve Length | Sleeve Rows |
| S | 900 | 38” (33”) | 133 | 18” (17”) | 9” (8”) | 11” (10”) | 83 |
| M | 1100 | 43” (37”) | 149 | 18” (17”) | 9” (8”) | 11” (10”) | 83 |
| L | 1300 | 46” (41”) | 163 | 20” (18”) | 9” (8”) | 12” (11”) | 90 |
| XL | 1600 | 51” (45”) | 179 | 20” (18”) | 10” (9”) | 12” (11”) | 90 |
| 2X | 1800 | 54” (47”) | 189 | 20” (18”) | 10” (9”) | 13” (12”) | 97 |
| 3X | 2000 | 58” (51”) | 205 | 21” (19”) | 10” (9”) | 13” (12”) | 97 |
| 4X | 2200 | 62” (55”) | 219 | 21” (19”) | 11” (10”) | 14” (13”) | 103 |
| 5X | 2400 | 66” (58”) | 231 | 21” (19”) | 11” (10”) | 14” (13”) | 103 |

Crochet Top Pattern
Prefer the downloadable, ad-free PDF? You can find it here.
Body Panel A (back panel):
Ch 68 (76, 82, 90, 96, 104, 110, 118)
Row 1: Dc in the 2nd ch from your hook. *Sc in the next ch, then dc in the next ch*; repeat from * across to the end. Ch1, turn.
Row 2: Skipping the first stitch, work a dc above the sc from the previous row, *sc in the next st, dc in the next st*; repeat from * across to the end then work a dc in the turning ch. Ch1, turn.
Row 3-69 (69, 71, 72, 72, 74, 76, 76): Repeat row 2. [to adjust length, you can add or remove rows, making sure to add/remove the same # of rows from Panels A & B]
Cut & tie off.
Body Panel B (front panel – make 2):
Ch 34 (38, 42, 46, 48, 52, 56, 58)
Row 1: Dc in the 2nd ch from your hook. *Sc in the next ch, then dc in the next ch*; repeat from * across to the end. Ch1, turn.
Row 2: Skipping the first stitch, work a dc above the sc from the previous row, *sc in the next st, dc in the next st*; repeat from * across to the end then work a dc in the turning ch. Ch1, turn.
Rows 3-41: (41, 40, 41, 41, 40, 38, 38): Repeat row 2. [to adjust length, you can add or remove rows, making sure to add/remove the same # of rows from Panels A & B]
Row 42: (42, 41, 42, 42, 41, 39, 39): In the 2nd st from your hook, YO and pull up a loop, YO and pull through the first 2 loops on your hook, then insert your hook into the next st, YO and pull up a loop then YO and pull through all the loops on your hook. *Dc into the next st, then sc into the next st*; repeat from * across to the end then work a dc in the turning ch. Ch1, turn.
Row 43: (43, 42, 43, 43, 42, 40, 40): In the 2nd st from your hook, work a dc above the sc from the previous row, *sc in the next st, dc in the next st*; repeat from * across until the last st. In the last st, YO and pull up a loop, YO and pull through the first 2 loops on your hook, then insert your hook into turning ch, YO and pull through all the loops on your hook. Ch1, turn.
Rows 44-69: (44-69, 43-71, 44-73, 44-73, 43-75, 41-77, 41-77): repeat rows 42 & 43 (42&43, 41&42, 42&43, 42&43, 41&42, 39&40, 39&40).
Cut & tie off.

Sleeves:
Ch 32 (32, 32, 36, 36, 36, 40, 40)
Row 1: Dc in the 2nd ch from your hook. *Sc in the next ch, then dc in the next ch*; repeat from * across to the end. Ch1, turn.
Row 2: Skipping the first stitch, work a dc above the sc from the previous row, *sc in the next st, dc in the next st*; repeat from * across to the end then work a dc in the turning ch. Ch1, turn.
Rows 3-83: (83, 90, 90, 97, 97, 103, 103): Repeat row 2.
Cut & tie off.
Assembly:
*You can use whatever method of seaming you are most comfortable with – I prefer the mattress stitch since you cannot see it in the front*
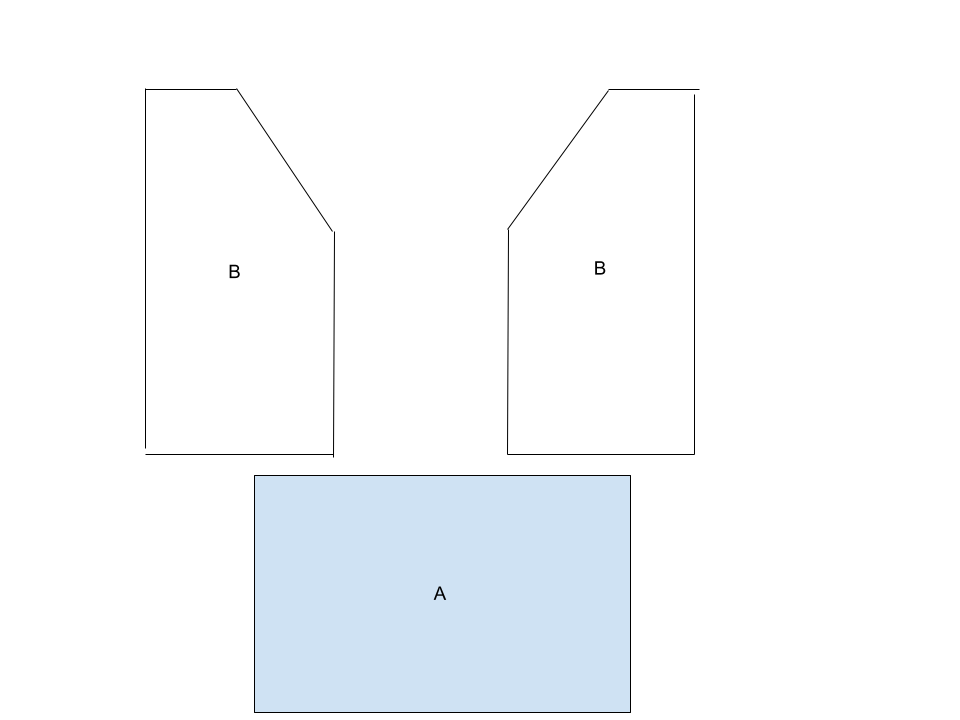
Place your panels out as seen in the schematic below. You should have your two front panels (panel B’s) facing each other to create a “V” and your back panel (panel A) below. You might want to place a stitch marker at the bottom of the “V” on panel B so you know where to stop seaming and to make sure your panels are lined up.
Seam your front two panels together using a mattress stitch then flip this new panel over so the seam line is facing upwards.
On your back panel, place stitch markers where your sleeves should end (where you will stop seaming). This measurement can be found in the size chart in the “Sleeve Depth” column. The measurement should begin at 0” at the top (shoulder) of the piece and be measured downward toward the bottom of the piece. With stitch markers in place, seam your one-piece front panel to your back panel using mattress stitch again. Make sure you seam so that the seam lines are all on the inside of your top. Repeat this process on both sides. Once done, seam your shoulders together. Seaming for the shoulders begins at the opening of the “V” and ends at the end of the front panel.
For the sleeves – seam your sleeve panel to your body panel starting at the bottom of the armhole then working your way up and around. Then seam the bottom of your sleeve panel together. Repeat for the other side.
Weave in all your ends.
Blocking:
Follow the care instructions on your yarn label when blocking. I chose to steam block my piece to loosen and smooth out the stitches.
That’s it! You’ve now finished your Everflow Tee. I hope you enjoyed this pattern as much as I enjoyed designing it.
Looking for more free crochet patterns?
Stay Connected!
This pattern, including all photographs, schematics, & charts herein, are the intellectual property of YarnThrift LLC. & protected by copyright laws. You may not copy, sell, distribute, or claim this pattern as your own, in whole or in part. You may sell items made from this pattern, but you must credit me as the designer. All rights reserved © YarnThrift LLC. 2021